 Dr. Rutgers has very detailed
instructions available, along with several articles describing the physics of
soap films, which he uses to visualize fluid flow. Briefly, the device consists of a
large loop of fishing line. The upper end of the loop is fed through a length of 1/8
inch tubing, which in turn is fed into a reservoir of soap solution. The bottom of the
loop is attached to a small weight, while additional pieces of line are attached
to the sides of the loop which allow it to be pulled open. Solution from the reservoir
constantly flows down the loop, which produces a soap film when opened. The weight
pulls the loop closed when the side pulls are released, allowing a new film to be formed
quickly.
Dr. Rutgers has very detailed
instructions available, along with several articles describing the physics of
soap films, which he uses to visualize fluid flow. Briefly, the device consists of a
large loop of fishing line. The upper end of the loop is fed through a length of 1/8
inch tubing, which in turn is fed into a reservoir of soap solution. The bottom of the
loop is attached to a small weight, while additional pieces of line are attached
to the sides of the loop which allow it to be pulled open. Solution from the reservoir
constantly flows down the loop, which produces a soap film when opened. The weight
pulls the loop closed when the side pulls are released, allowing a new film to be formed
quickly.
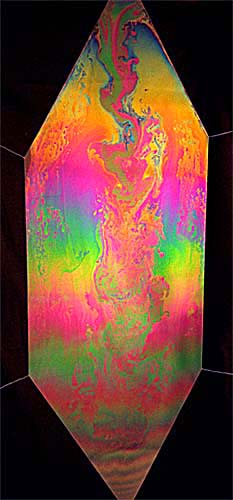
Because the solution flows continuously, no part of the film is exposed to the air for
more than a few seconds, rendering evaporation moot. By adjusting the flow rate, the
thickness of the film can be varied; thinner films, such as those shown here,
exhibit more brilliant colors, but are more fragile than thicker ones. Very large rates
drive the film into supersonic flow, causing it to oscillate madly and eventually
destroy itself.
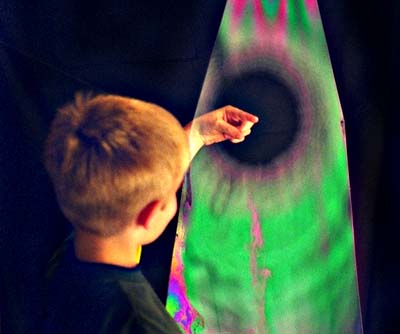
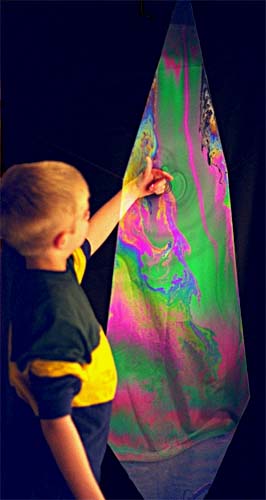 Not surprisingly, kids flock to this thing. If you get an object wet with solution,
you can insert it into the film and observe the flow pattern around it. Fingers are
a good choice; the film will tend to creep towards your wrist as it tries to minimize
its area by seeking the thickest part of your finger. Blowing on the film is fun, too,
although it is hard to get a bubble to separate without breaking.
Not surprisingly, kids flock to this thing. If you get an object wet with solution,
you can insert it into the film and observe the flow pattern around it. Fingers are
a good choice; the film will tend to creep towards your wrist as it tries to minimize
its area by seeking the thickest part of your finger. Blowing on the film is fun, too,
although it is hard to get a bubble to separate without breaking.
When the film does break, it contracts very quickly, throwing droplets of solution
in all directions. It's probably a good idea to put a tarp down on the floor, or set
up in the garage. A gallon of water with a quarter cup of Joy or Dawn dish soap added
will last for an hour or more, and can be reused if you are especially frugal.

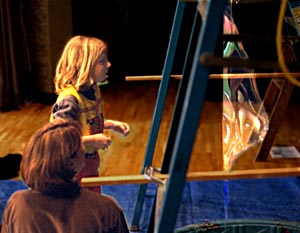 Some of these pictures were taken during a demonstration I did at the Kingsbury School in
Oxford, Michigan. The films here are about eight feet high, and are suspended from a couple
of ladders; we used a fishing reel to pull the loop open. Even with kids blowing on the film
and sticking their hands through it, we had several films that lasted for ten minutes or
more. When the film does break, it only takes a few seconds to pull a new one, so all
the students had a chance to play with it individually.
Some of these pictures were taken during a demonstration I did at the Kingsbury School in
Oxford, Michigan. The films here are about eight feet high, and are suspended from a couple
of ladders; we used a fishing reel to pull the loop open. Even with kids blowing on the film
and sticking their hands through it, we had several films that lasted for ten minutes or
more. When the film does break, it only takes a few seconds to pull a new one, so all
the students had a chance to play with it individually.
Although we were limited by the height of the ladders, we hope to perform this demonstration again with the nozzle suspended from the ceiling of the gym, about twenty five feet up. We are searching for other tall spaces in the area as well.
 Lighting is especially important in making the films visible, particularly if you want
to photograph them. They are best viewed against a black background. A broad, diffuse
light source should be positioned in front of the film, illuminated as brightly and
evenly as possible. Bed sheets work well for both applications. Try to shade the camera
from direct glare from the light source.
Lighting is especially important in making the films visible, particularly if you want
to photograph them. They are best viewed against a black background. A broad, diffuse
light source should be positioned in front of the film, illuminated as brightly and
evenly as possible. Bed sheets work well for both applications. Try to shade the camera
from direct glare from the light source.
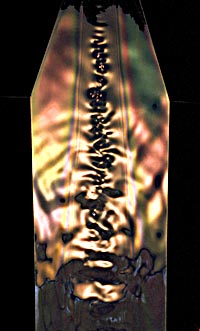
Light from the diffuse source should reflect off the soap film towards the camera, as shown. As the angle A becomes very small, the amount of light reflected from the soap film decreases; a film illuminated head-on reflects less than 10 percent of the light hitting it. As A increases, so does the amount of reflected light, but the film presents a narrower face to the camera. A happy compromise for A seems to be about 15 degrees. The pictures shown here were taken with ASA 800 film at f1.8 and 1/250 second exposure, with illumination provided by two 500 watt halogen lights. It would be interesting to try other light sources, such as fluorescent lamps or a Xenon flash, which have discrete spectral peaks.
Finally, it would be interesting to extend this technique to bubbles, perhaps making a nozzle from two concentric funnels. Some care would be needed to ensure a consistent flow rate all the way around the circumference. Very large bubbles would eventually fall off the nozzle due to their weight; it might be prudent to use hot air in such cases to give them a bit more buoyancy.
Originally posted January 27, 1999.
I maintain links to all my pages with a single JavaScript program. If the links don't appear below, you either have JavaScript turned off or are using an older browser. In any case, you can always see a complete list of links on my Home Page. If you have questions or comments about this site, please send me an message.